Recently, I made a steampunk wall art assembly for my son, Matthew's, dorm room at Stephen F Austin University. I made part of the structure to hang pieces of his steampunk costume from, like his top hat and goggles, but it needed something more. I thought a rocket pack would fit in nicely, but I only had one day and basically the stuff I had on hand to build it with. This was my solution and I think it turned out rather nicely. I know there are many other tutorials on the web dealing with rocket packs, but maybe this will provide some ideas for a basic structure for more elaborate designs. I am not going to give exact dimensions for the pieces, since the size of materials may vary depending on what is available to the builder.
I started by finding an old super soaker water gun in my shed with two water tanks. I painted them with black spray paint formulated to work on plastic. After that I painted them with gold spray paint.
I used e-6000 glue to attach them to a small rectangle of mdf board painted flat black. About 1 1/2 inches out from each tank I also glued a length of dowel about the size of a pencil.
Next,I cut wing shapes out of black foam core board. My design involved cutting a base shape and two more pieces to stack on top. I glued these up with wood glue and then painted them with hammered steel spray paint.
I did have to go to the local hardware store for a couple of PVC couplings for use as rocket nozzles. I spray painted them black and them painted them with gunmetal acrylic paint.
When the wings and nozzles were dry, I used e-6000 to glue them to the tanks and the dowels. The dowels make the wings lift away from the base. After the glue dried I used copper rub and buff to distress the tanks.
While the glue was drying, I made some metal patches for the wings using black fun foam and gray metal epoxy. I cut rectangle shapes to fit the wings and used the epoxy to make rivet heads around the edges. When the epoxy dried enough, I painted the patches with black acrylic. When the paint dried I went over the patches with rub and buff and used contact cement to glue them to the wings.
Finally, I used contact cement to attach strips of brown fun foam around the tanks at the top and bottom to simulate leather bands holding the tanks down. At this point, I was done, since this rocket pack was only going to hang from a wall. However, it would not be difficult to attach straps to the mdf board so this could be worn. Any number of extra gears, gauges, wires, etc. could added to make it more complex. The wing design can also be altered to suit any style.
Last Saturday, April 23rd, BSA Venture crew 57 of Garland, Texas took part in the Third Annual Rowlett Cardboard Boat Regatta in Rowlett, Texas. The rules were pretty simple. Build a boat made entirely of cardboard capable of carrying three to five people and race out about 50 yards to a set of buoys on the pond and back again, with the first boat to touch the shore winning. I'm proud to say that the crew won the race and received the award for best boat construction as well. Usually, the race is held with the result being that the boats are mostly destroyed by the time they reach shore and they are then hauled to the trash dumpsters. Our boat was so well made it suffered only the slightest damage and as a result, I'm wondering what to do with an eleven foot long cardboard boat. Right now it sits in my backyard until we can find it a more permanent home.
This is the second time the crew has entered the race and this time was a vindication for us after last year's disastrous entry. We built what we thought was a good boat, only to have it go down seconds after it hit the water. The design was based on a Viking long ship with dragon's head and tail ornaments at the bow and stern, but it turned out to be way too narrow for its length and it rolled over as soon as we got into it. We did manage to save the head and tail, though, and we vowed that this year would be different. A newer and better design would emerge from the ashes of that failure, a Phoenix if you will.
The 2015 Viking Long Boat
12 feet long with four seats
Since that time, we have worked on how to best build a fast and stable boat that still looks good. What we came up with is this year's deign, The Phoenix, a steampunk themed paddle boat on pontoons capable of holding three people. It worked very well.
To start, we settled on our three lightest crew members to man the boat and figured out their weight plus the estimated weight of the boat to determine how much water the pontoons would need to displace to keep the boat afloat. We estimated that our crew and boat would weigh somewhere between 375 to 400 pounds. The pontoon design we settled on was about 8 inches wide at the top, 2 inches wide at the bottom and 8 1/2 inches tall with a cross section of 42.5 square inches or 0.295 square feet. Water weighs approximately 62.5 pounds per cubic foot. Therefore we estimated we would need our boat to displace about 6 1/2 cubic feet of water, which would require that each pontoon be about 11 1/2 feet long. The deck on top of the pontoons would be 2 1/2 feet wide by 7 1/2 feet long, allowing for lots of side to side stability and room for the crew to move around as needed. With this in mind we began construction.
Cardboard, as you may have guessed, is not the strongest material in the world and simply stacking layers of it together will not give you the strength and stiffness required. however, using cardboard to create a latticework frame covered with two outer layers of board can result in something very strong.
The two shapes made to form the structure of our boat were cross sections of the pontoon that were placed every four inches along its length and 1 1/2 inch strips used to create a grid pattern under the main deck and also to hold together all of the pontoon sections.
Basic shapes used to make boat structure
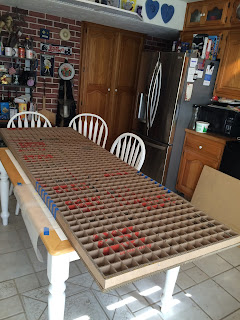
The pieces shown above are the two shapes used to create the underlying skeleton of the boat. I cut out pontoon section pieces and 1 1/2 inch wide by approximately 20 inch long strips, taped 15 or so of them together and ran them across my table saw to make 3/4 inch deep notches every 2 inches. Then I glued them together to make a short section of pontoon or deck structure, as shown below. This allowed us to make a large boat out of smaller pieces of cardboard.
One foot section of pontoon
Two sections joined together
Sections of pontoon and deck starting to add up
This shows how the structure of the underside of the boat will work
The final shape of the deck with pieces of thick cardboard glued to the underside.
Approximately 2 1/2 feet by 7 1/2 feet.
It proved to be very sturdy and did not flex in the water after the pontoons were added.
One of the pontoons almost full length and starting to be covered by the first outer layer of cardboard
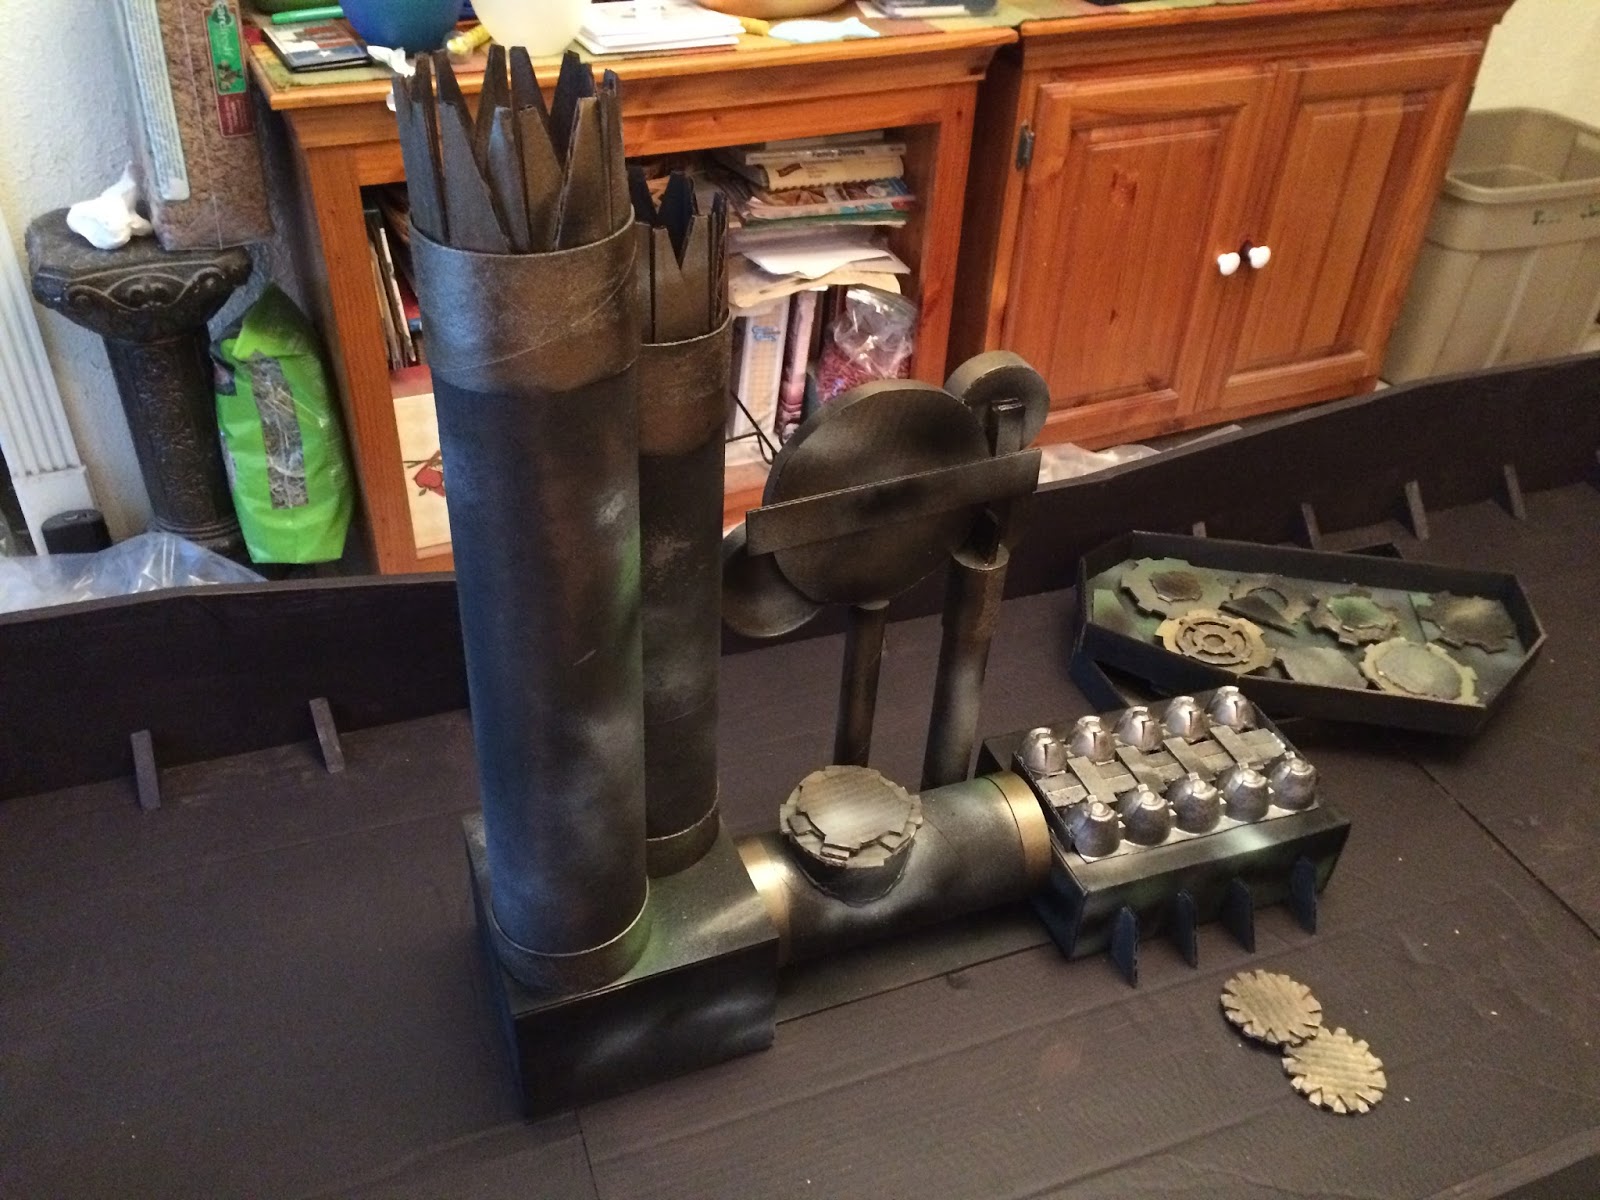
Working on the boat in smaller pieces made it easier to store in my garage. While I was working on the structure at my house, the rest of the crew was working on the ornament for the boat. The decorations were broken down into smaller components as well so they could be easily stored and added to the craft at the end. The main decorations are shown below.
Crew cutting gears and trim for boat
Lots of gears
One of two gear panels for the sides of the boat
One of two paddle wheels
The engine block for the rear of the boat, made from various cardboard tubes, boxes and a cardboard egg container
Here you can see the gauge faces of the engine.
Various wing deigns are proposed
Krista draws the Phoenix Head ornament
The Phoenix Head ornament and wings completed
More cutting
So much cutting
Finally, the pontoons and deck pieces were finished and glued together into the final boat shape. Thick cardboard was used to make sides about ten inches high around the deck. All of the edges were sealed with water activated paper tape so that no exposed edge of cardboard was showing.
Boat almost finished. More cardboard was added to create a continuous wall around the deck.
After the boat was glued up, it was turned over and the pontoons and the lower four inches of the walls around the deck were painted with three layers of waterproof paint. That was followed by one layer of red exterior paint on the bottom of the boat and black exterior paint for the top of the boat. I chose those colors because that was what was available in the discounted paint section of Home Depot.
Waterproofing the boat
The final color
At that point, the boat part of the boat was finished. The ornament was added on race day using Velcro and gorilla tape. Before the race, most of the stuff that stuck out from the boat which might hinder paddling was removed, such as the paddle wheels, the smokestacks and the Phoenix head ornament. This made it much easier for the crew to enter the boat when launching it from the shore and taking the paddle wheels off made it possible for the middle person to help row.
Here are some pictures of the boat on race day.
Arrival at the park. Getting ready to carry the boat to the pond.
The Phoenix Mast Head. The flames below the head are made from the scales of the dragon head from the previous year's boat.
Finished paddle wheel. They were made to lift off from the boat before the race.
View of the gear panels and a view of the gauge faces on the motor assembly.
View of the engine from the back of the boat.
Matthew, Krista and Kyle; the valiant crew
Getting ready to enter the water
Most of the ornament has been removed to make racing easier
The race went very well. In the adult division, only the crew of the boat are allowed to touch the boat while launching it from the shore. Our crew had a little bit of trouble getting into the water due to the length of the boat, but eventually they made it and they took off straight as an arrow. Even though they were one of the last boats to enter the water they were one of the first to reach the buoys at the halfway point. This is where our design really worked well. The boat is long and wide and therefore does not turn easily, but this was no problem at all. Since the boat is symmetrical, everyone just turned around on the deck and they brought the boat back backwards. While everyone else was making their turns we were well on the way back. One other boat, from a rival Venture Crew was also doing well that day. They managed to catch and even overtake our boat for a short time on the way back, but in the end our crew never gave up and our boat touched shore about a second ahead of theirs. Matthew then stood up on the deck to take a bow and celebrate our victory and redemption.
Finally, a word of thanks to those who helped us. The crew came up with the design of the boat and how to decorate it, but we did receive a lot of technical construction advice from youtube. Use the following searches for some very good tips on how to build a cardboard boat.
Mike Thompson Cardboard Boat - Mike has some excellent videos dealing with the mathematics of boat design as well as practical construction tips.
City of Arlington Cardboard Boat School - Just about everything you need to know to design and build a boat
Although Philmont provides tents to expedition crews, they do not provide stakes. Therefore, you need to pick up a good set before you go. Even if you bring your own tent, upgrading the stakes from what the manufacturer provides is usually a great idea. The ground at Philmont is often hard and rocky. If your stakes are bent out of shape by day two, you have ten frustrating nights to look forward to when setting up camp.
This summer, I will be taking my Eureka Apex 2XT tent to Philmont. It's a nice three season tent suitable for backpacking, but the stakes are pretty bad (picture 1). The tent comes with a set of 7" steel stakes that bend pretty easily.
Picture 1 - Steel Tent Stakes (before and after)
On past weekend camp outs, I have replaced them with similar length aluminum stakes, which cost about $1.00 each (picture 2) . These work well in normal soil and are definitely more durable than the thin steel ones. After a few uses in rocky ground, they will also bend.
Picture 2 - Aluminum Tent Stake
For Philmont, I picked up a set of y-shaped aluminum stakes (picture 3). They cost a little more than $2.00 apiece on average,but they are your best bet on an extended camp out.
Picture 3 - Aluminum Y-Shape Tent Stake
The Philmont gear list suggests bringing ten stakes per person, which works out to twenty stakes per tent. I don't think that many are necessary. Philmont is all about taking what you need and no more. My suggestion is that you carry one and a half times as many stakes as are required to set up your tent. My tent requires six stakes, so I will take nine. Actually, I will probably take ten, with both me and my tent mate carrying five each. Tent stakes seem like a little thing when you are packing, but it is worth the extra money to buy good ones.
It is vitally important to be in good physical condition before attempting a Philmont Trek. As long as you have to exercise anyway, you may as well earn a patch for it. The BSA has just the thing with the Scout Strong Presidential Active Lifestyle Award. To earn this award, go to
Go to the tab that allows you to select your state or location and choose it. Select the BSA Council you belong to and then start the PALA challenge. You can then create or login to your account which allows you to keep up with your progress. In order to qualify for the award, an adult must take part in 30 minutes of physical activity at least five days a week for 6 out of 8 weeks. This activity can be almost anything, from yard work to running a triathlon. Youth participants must log 60 minutes of activity five days a week for 6 out of 8 weeks. There are also recommendations for helping to stay on a healthy diet during the program. After successfully completing the program you receive a congratulatory email from the PALA program which you should print and present to your Troop's advancement chairperson to receive the patch.
This award should be easy for anyone going to Philmont. This should be the minimum amount of conditioning you are doing to get ready.
One of the easiest and most important things a hiker can do to prepare for Philmont is to get into the habit of drinking enough water everyday. This needs to start well in advance of the actual trek in order to reap all of the benefits of proper hydration. A good guideline to follow is to drink one ounce of water per day for every 2 pounds of body weight. For example, a 160 pound man would need to drink 80 ounces of water per day, or ten 8 ounce glasses of water. This intake should be spread out over the entire day. Some of the benefits of drinking water are:
Drinking water can help thin the blood out which helps lower blood pressure.
Drinking water can also help control cholesterol levels. Dehydration can cause a rise in the acidity of the blood, which in turn can lead to an increase in LDL cholesterol. Maintaining proper hydration thins the blood allowing wastes to be more efficiently eliminated.
Drinking water helps lubricate joints and flush wastes from the muscles, eliminating a lot of small aches and pains.
Staying hydrated is important to help prevent altitude sickness. Lower oxygen levels at high altitude combined with greater physical exertion can easily cause dehydration. Drink plenty of water even if you don't feel thirsty to prevent this.
Substituting water for high calorie sodas is an excellent way to trim empty calories from your diet. If you normally drink one 150 calorie soda per day you can eliminate 54750 calories from your diet each year by drinking water instead. It doesn't seem like a lot, but 54750 calories is enough for an average man to live on for about 27 days.
Seventy five percent of the human body is made up of water. The brain is made up of eighty five percent water. Give your body and brain what it wants and drink plenty of water every day. We all want to have a great experience at Philmont and staying hydrated before and during the trek is an important first step.
My Last post listed the gear each crew member is responsible for at Philmont. This and future posts will deal with choosing gear in the various subcategories on that list, starting with backpacks.
Choosing the right pack for Philmont is an important decision. If you don't already have a pack, try to borrow some from friends or rent them from outfitters such as REI for use on the shakedown campouts. Each style of backpack has its own set of advantages and drawbacks. Backpacks fall into two main categories.
External Frame Backpacks
External frame backpacks, as the name would suggest, consist of a pocketed nylon or canvas bag attached to a rigid pack frame. Often these packs are smaller in terms of the number of cubic inches the bag will hold compared to an internal frame pack. This is because it is much easier to lash gear, such as sleeping bags and tents, to the outside of the pack. They also usually have more compartments and external pockets than an internal frame pack making it easier to retrieve something without having to empty the entire pack. because of their larger frame structure, they are often a bit heavier than internal frame packs. This is the type of pack I grew up with and it is still the type of pack I prefer. These Packs are designed to be loaded with the heaviest gear, usually the tent, lashed to the top of the frame. The lower section of the pack is usually loaded with the sleeping bag and sleep clothes. The ground pad is either placed in the lower compartment or lashed to the bottom of the pack. The top compartment carries clothes, cooking gear and food. Items that are required throughout the day are placed in the outer pockets. This type of pack is usually more top heavy than an internal framed pack, which can cause balance problems if you are going up very steep trails or do much climbing while hiking. They also tend to present a larger and wider profile than the internal framed packs, making them more prone to snag on overhanging branches and other things on the trail.On the plus side, the external frame holds the pack away from your body allowing for more air circulation around your back which makes you feel cooler. At Philmont, however, the trails are generally free of obstacles and they are not especially steep most of the time, so this type of backpack will work there. Philmont recommends that an external frame backpack have a capacity of at least 4000 cubic inches. The last time I went, I took a pack of this size and I also took a hip pack for use during side hikes. I lashed it to the outside of my pack when not in use.
Internal Frame Backpacks
Internal frame backpacks are by far the most popular choice among hikers today, so there is a much greater selection of them from which to choose. They are made up usually of one big sack with perhaps two large side pockets with the framework built into the inside of the pack. There is also usually a smaller bag that forms the top cover of the pack and which is often removable for use as a day pack. These packs are basically duffel bags with a frame. Everything goes into the big bag and very little if anything is lashed to the outside. This gives the bag a more compact profile so they don't stick out to the sides of the hiker, making them ideal for narrower trails. They are packed so that the lightest and least used items are placed at the bottom of the bag. Heavier items, such as stoves and fuel bottles, are placed up in the middle of the bag and against the back while placing lighter items such as clothing as a cushion around them and toward the outside of the pack. Items that will be needed on the trail are placed in the top bag and pockets. A nice feature of many of these bags is that a camelback or other hydration system is often built into them. If loaded properly a hiker will have a lower center of gravity using these packs, which is helpful in situations where balance is an issue. On the negative side, these packs are designed to hug the body, allowing no air circulation between your back and the pack. Also, finding something in your pack may involve a lot more unloading than with an external frame. This is the type of pack that my son used the last time we went to Philmont, and he was very pleased with it. Philmont suggests using an internal frame pack with a capacity to hold at least 4800 cubic inches.
Pack Covers
Whichever type of pack you decide you will also need a pack cover. These things look like big shower caps that go over your pack. Most packs are water resistant to a certain degree and a light drizzle or the occasional splash will probably not penetrate them. But they are not waterproof and every seam and zipper has the potential to let water in. Rainstorms are very common at Philmont, but that does not stop the hike. Also, we will not be able to bring our packs into our tents at night so a good pack cover is a must.
Items such as clothes and sleeping bags should also be placed in waterproof ziplock or plastic bags inside the pack as a last line of defense. Your pack cover should be easily accessible in a pocket of your pack so it can quickly be put on during a hike.
This summer my son and I along with ten other scouts and adults from my troop will be going on a trek at the BSA Philmont Scout Ranch in New Mexico. Although we will be going in July, preparation for the trip has already started. As the Crew advisor, I plan to use this blog as a way to pass on information to my crew as well as create a forum to get their input and questions.
At this time, everyone should be exercising on a regular basis to be able to handle the rigors of an eleven day hike. Philmont has a very strict policy regarding the weight to height ratios of its participants. These ratios can be found in the BSA medical form, part C. It lists the recommended weight range for each height as well as the acceptable upper limit and maximum weight allowed for each height. Speaking from personal experience, the last time I went to Philmont, I was within the allowable weight range but well over the recommended weight. I completed the trek, but I struggled at times. This time I am within the target range for my height and I feel a lot more confident about the hike. Remember, every pound you lose is one less pound you have to carry up the mountain. Your pack will already be heavy enough, I guarantee. So if you haven't already, begin some sort of aerobic and strength training.
Below is the suggested gear list for each person at Philmont. It does not include items shared between two people, such as a tent, or items shared among the whole crew, such as food, stoves, cooking gear, etc.. Be on the lookout for sales at the various sporting goods stores. Often they will have sales on specific types of gear at different times of the year. I realize that everyone has a limited budget with which to purchase gear and it is not necessary to have the most expensive gear to enjoy Philmont. Some items are worth spending a little extra on, though, such as boots. I will post articles in the future on the pros and cons of different types of gear.
Philmont Gear List:
Packing
Pack - External Frame - 4000 cu. in +/-
Internal Frame - 4800 cu. in. +/-
Pack Cover (TT)
6-12 gallon size Ziplock Bags to pack clothes in (TT)
Sleeping
Sleeping Bag in Stuff Sack lined with Plastic Bag
Sleep Clothes (T-Shirt and Gym Shorts)
Straps to hold Bag on Pack (TT)
Foam Sleeping Pad (Closed Cell or Thermarest) (TT)
1 Long Pants, cotton or nylon (not heavy jeans)(TT)
1 pair Insulated Underwear (synthetic)(TT)
Layer C (Cold)
1 Sweater or Jacket (wool or polar fleece)(TT)
1 Stocking Cap (wool or fleece)(TT)
1 Glove Liners or Mittens (wool or polar fleece)(TT)
Layer D (Cold, Wet, Windy)
1 Sturdy Rain Suit (TT)(A)
Eating
Deep Bowl (small, plastic or metal)(TT)
Cup (style)(TT)
Spoon (TT)
3-4 1 Quart/Liter Water Bottles (TT)(BB)(A)
Personal and Miscellaneous
Small Pocketknife (TT)(A)
Matches and Lighter in Waterproof Container (TT)(BB)(A)
Flashlight, small with extra batteries (TT)
Compass, liquid filled (TT)(A)
2 Bandannas or Handkerchiefs (TT)(BB)
Money ($20-$50 in small bills)
Lip Balm or Chapstick (TT)(BB)(A)
Soap, biodegrabable (TT)(BB)(S)
Toothbrush, Toothpaste (TT)(BB)(S)
Small Camp Towel (TT)
Sunglasses, inexpensive (TT)
Ditty Bag for personal items in bear bag (TT)
Personal First Aid Kit
Optional
Camera and Film or Memory Cards (TT)(BB)(A)
Whistle (TT)(A)
Watch, inexpensive
Fishing Equipment, Licenses (TT)
Postcards, prestamped (TT)
Foot Powder (TT)(BB)(S)
Note Pad and Pen (TT)
Day Pack for side hikes (TT)
codes:
(TT) item is for sale at Philmont's Tooth of Time Trader's
(BB) item to be placed in bear bag at night
(A) item easily accessible in pack or on person
(S) item can be shared with a buddy
DO NOT BRING
Radios, CD/MP3 Players, Video Game Devices
Hammocks
Cell Phones and Personal Satellite Locators (SPOT) are discouraged
Deodorant
This is the suggested list from Philmont. I know that there are items on the list that some people feel are not needed and some things that are not on the list that some people cannot do without. This is a good list of the minimum amount of gear you will need.
There will be a meeting of crew advisors on February 23. I will get a lot of information about the different lengths and types of treks available to us and the dates for turning in paperwork, check in procedures, etc. After that meeting I would like to schedule a meeting for our crew and parents in early March to answer questions and plan some shake down hikes this spring.