Race day was yesterday, and as usual with me, I was working on the car up to the last minute. This was a good week for working on projects at home. An unusually severe cold snap has closed the schools for the week and brought much of the city to a halt.
As of the last post, I had finished painting the car and made and painted a lot of the car's accessories. Now it's time to put it all together as well as try to get the car up to the proper weight.
After weighing the car, wheels, axles and other additional pieces I was still about an ounce and a half light. I decided, therefore to add one ounce of weight to the driver. This would put a nice chunk of weight at a good spot on the car, low and just in front of the back wheels. I used the drill press and a 3/8" forstner bit to hollow him out and then sealed in a tungsten fishing weight with some super glue and wood putty.(Figs. 1,2) Tungsten weights work great on pinewood cars because they are very heavy for their size so you can fit a lot of weight into a small space. The drawback, however, is that they are a bit expensive, as much as three times more costly than the zinc weights available at hobby stores. But if you need to get a lot of weight into a small space on your car, the only answer is tungsten.
Figure 1 - Driver Hollowed Out for Tungsten Weight
Figure 2 - Weight Added (Then sealed in with Wood Putty)
At this time I also drilled a 3/8" hole in the underside of the car near the rear to hold another bit of weight at the end of construction. I also drilled pilot holes and countersinks for four #6 1/2" flat head screws.(fig. 3) These are the fine tuning weights for my car. Each one weighs about 0.05 ounces, so four of them make up about 0.2 ounces that can be easily removed on race day if my scale and the racetrack scale are not calibrated exactly the same. Always make sure to have easily removable weight so you don't have to do any drastic surgery to your car at the race.
Figure 3 - Fine Tuning Weights and Hole for Extra Weight
The next step was a rather delicate and time consuming one. This car is a tribute to my cousin, Norman Bryant (the Texas Giant), who used to belong to a Seattle based rock band called The Machine, so I wanted to put their name on the car. After printing out their logo, I put a strip of painter's tape on my cutting board and then scotch taped the logo on top of that. Then I very carefully cut out the logo with my craft knife and created a stencil in the painter's tape. Then I removed the tape from the cutting board and placed it on the car, along with the tiny little pieces of tape that are in the middle of the letters.(Fig. 4) After that I masked off the rest of the car with newspaper and very lightly painted the stencil with some flat white spray paint.(Fig. 5) I have found that on small projects like this, where the designs are small and the surface you are trying to paint is often irregular, using painter's tape to create a stencil is the only way to neatly paint an image. It's a bit of work and the stencil is a one time thing, but you get a very clean looking transfer. After the paint dried and I removed the tape, I spayed the hood with a few light coats of artist's fixative to better seal it to the car.

Figure 4- Painter's Tape Stencil
Figure 5 - Finished Transfer
Now it was time to start adding accessories to the car. First I painted the grill area of the car flat black and cut a few notches to accept 3 small e clips creating a sort of grill in the front.(Fig. 6) I trimmed off part of the clips to make them a half round shape. I also glued a slightly larger trimmed e clip behind the cockpit as the grill of an air intake and I superglued the headlight in place.
Figure 6 - Front Grill and Headlight
Then it was time to attach the wheel covers. I predrilled two holes in the flat parts of the wheel covers on the drill press to make sure the holes were perpendicular to the covers and then superglued in some decorative picture hanging nails I found that had heads that looked like little gears.(Fig. 7) Then at each tire position. I temporarily put on a wheel so that I could position the wheel cover next to it, making sure it did not touch, and then marking with a pencil the positions on the car body to drill holes to accept the nails. After everything was in the right place, I superglued the nails to the car body.(Fig. 8)
Figure 7 - Adding Nails to Wheel Covers
Figure 8 - Wheel Cover Glued to Car
The next step was to add the parts to the engine openings on each side and the accessories to each side of the car body. I went to the hardware store and picked up an assortment of small gear like washers, brass washers, e clips, and picture hanging nails.(Fig. 9) I used these to free form a set of engine works on each side of the car. I also added other components, such as an exhaust pipe, barrel, various gauges and a gear box.(fig. 10,11) I just arranged them in a way I thought looked best.
Figure 9 - Small Engine Pieces
Figure 10 - Right Side of Car
Figure 11 - Left Side of Car
Next, the spare tire was glued in and a picture hanging nail was used as a decorative tie down.(Fig. 12)
Figure 12 - Spare Tire
The next project was to complete the driver. Previously, I had painted on his suit, vest, tie and pocket watch.(Fig. 13) Next I made a small aviators jacket out of a scrap of faux leather.(Fig. 14) Finally, a blue scarf, aviator's leather helmet and a set of goggles made out of fun foam are added and the driver is complete.(Fig. 15) The driver was added to the car along with a steering wheel, another gauge on the dashboard and the back part of the air intake behind the driver.(Fig. 16)
Figure 13 - Driver's Suit Painted On
Figure 14 - Jacket and Scarf Added
Figure 15 - Aviator Helmut and Goggles
Figure 16 - Driver and Cockpit Complete
The final step was to add the wheels. I used the wheel gap attachment on my plastic alignment tool I bought from the BSA to make sure the gap between the car and the wheels was the same for all four tires. If you do not have an alignment tool, a credit card works just fine. After weighing the car I was still 0.3 ounces short of the 5 ounces allowed by the rules, so I added that amount of weight to the hole I had predrilled earlier.(Fig. 17) This time I used one of the round barlike weights you can find at the hobby stores that is easily cut into smaller pieces with a hacksaw. The car is complete !!! (Fig, 18)
Figure 17 - Wheels On and Final Weight Added
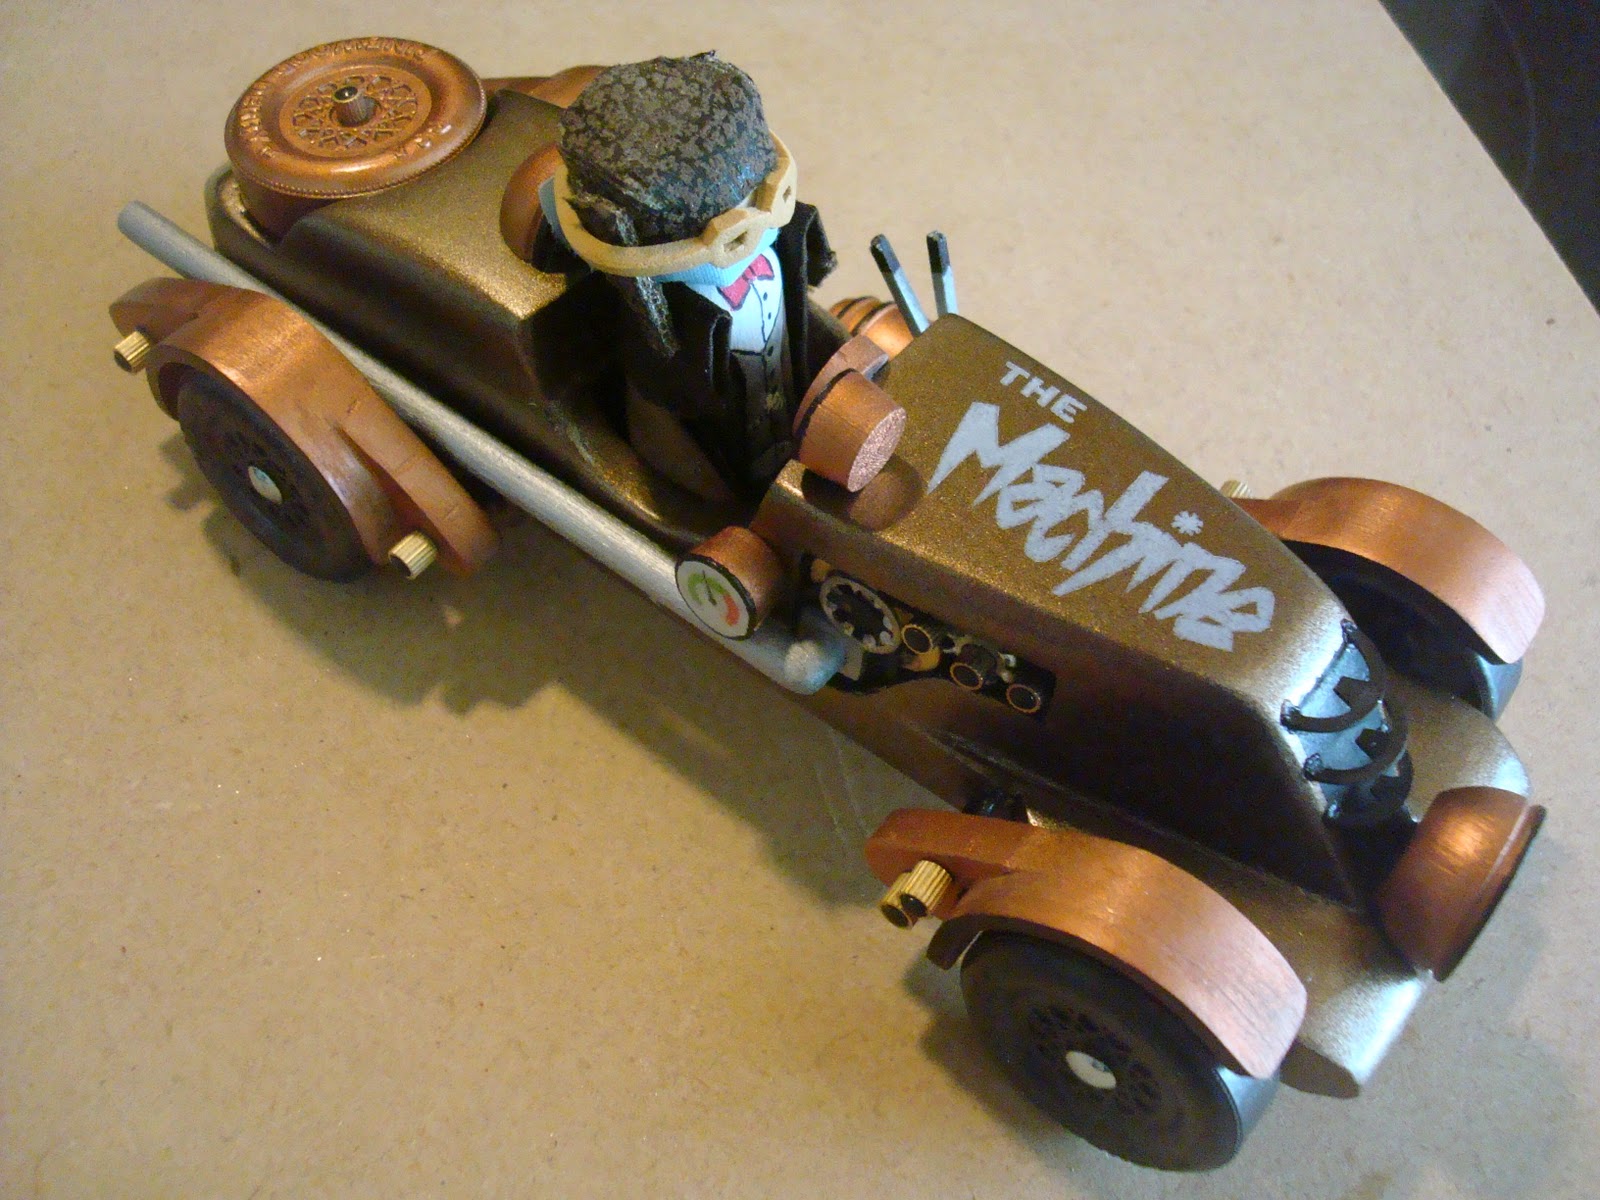
Figure 18 - The Car is Done !!!
This car was a lot of fun to make, and although it may be a more complex design than many people would build, the basic techniques I've tried to illustrate can be used on any car. Please leave me a message if you have any observations of your car building experiences that may help or questions about car building in general. I must admit that while this car looks good, it is not the best design for a super fast racer. Although I did win two out of four heats at the races, ultimately my overall time was only good enough for a twelfth place finish out of eighteen. Next time I'll build a car for speed as well. Good luck to everyone at the races !
Check back soon for a design on how to build a very simple yet elegant car display stand.