
This is the second time the crew has entered the race and this time was a vindication for us after last year's disastrous entry. We built what we thought was a good boat, only to have it go down seconds after it hit the water. The design was based on a Viking long ship with dragon's head and tail ornaments at the bow and stern, but it turned out to be way too narrow for its length and it rolled over as soon as we got into it. We did manage to save the head and tail, though, and we vowed that this year would be different. A newer and better design would emerge from the ashes of that failure, a Phoenix if you will.

The 2015 Viking Long Boat
12 feet long with four seats
Since that time, we have worked on how to best build a fast and stable boat that still looks good. What we came up with is this year's deign, The Phoenix, a steampunk themed paddle boat on pontoons capable of holding three people. It worked very well.
To start, we settled on our three lightest crew members to man the boat and figured out their weight plus the estimated weight of the boat to determine how much water the pontoons would need to displace to keep the boat afloat. We estimated that our crew and boat would weigh somewhere between 375 to 400 pounds. The pontoon design we settled on was about 8 inches wide at the top, 2 inches wide at the bottom and 8 1/2 inches tall with a cross section of 42.5 square inches or 0.295 square feet. Water weighs approximately 62.5 pounds per cubic foot. Therefore we estimated we would need our boat to displace about 6 1/2 cubic feet of water, which would require that each pontoon be about 11 1/2 feet long. The deck on top of the pontoons would be 2 1/2 feet wide by 7 1/2 feet long, allowing for lots of side to side stability and room for the crew to move around as needed. With this in mind we began construction.
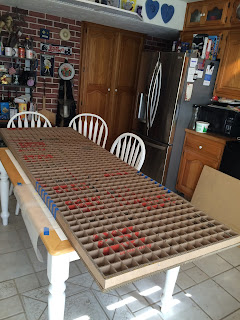
Cardboard, as you may have guessed, is not the strongest material in the world and simply stacking layers of it together will not give you the strength and stiffness required. however, using cardboard to create a latticework frame covered with two outer layers of board can result in something very strong.
The two shapes made to form the structure of our boat were cross sections of the pontoon that were placed every four inches along its length and 1 1/2 inch strips used to create a grid pattern under the main deck and also to hold together all of the pontoon sections.

Basic shapes used to make boat structure
The pieces shown above are the two shapes used to create the underlying skeleton of the boat. I cut out pontoon section pieces and 1 1/2 inch wide by approximately 20 inch long strips, taped 15 or so of them together and ran them across my table saw to make 3/4 inch deep notches every 2 inches. Then I glued them together to make a short section of pontoon or deck structure, as shown below. This allowed us to make a large boat out of smaller pieces of cardboard.

One foot section of pontoon

Two sections joined together

Sections of pontoon and deck starting to add up

This shows how the structure of the underside of the boat will work
The final shape of the deck with pieces of thick cardboard glued to the underside.
Approximately 2 1/2 feet by 7 1/2 feet.
It proved to be very sturdy and did not flex in the water after the pontoons were added.

One of the pontoons almost full length and starting to be covered by the first outer layer of cardboard
Working on the boat in smaller pieces made it easier to store in my garage. While I was working on the structure at my house, the rest of the crew was working on the ornament for the boat. The decorations were broken down into smaller components as well so they could be easily stored and added to the craft at the end. The main decorations are shown below.

Crew cutting gears and trim for boat

Lots of gears

One of two gear panels for the sides of the boat

One of two paddle wheels
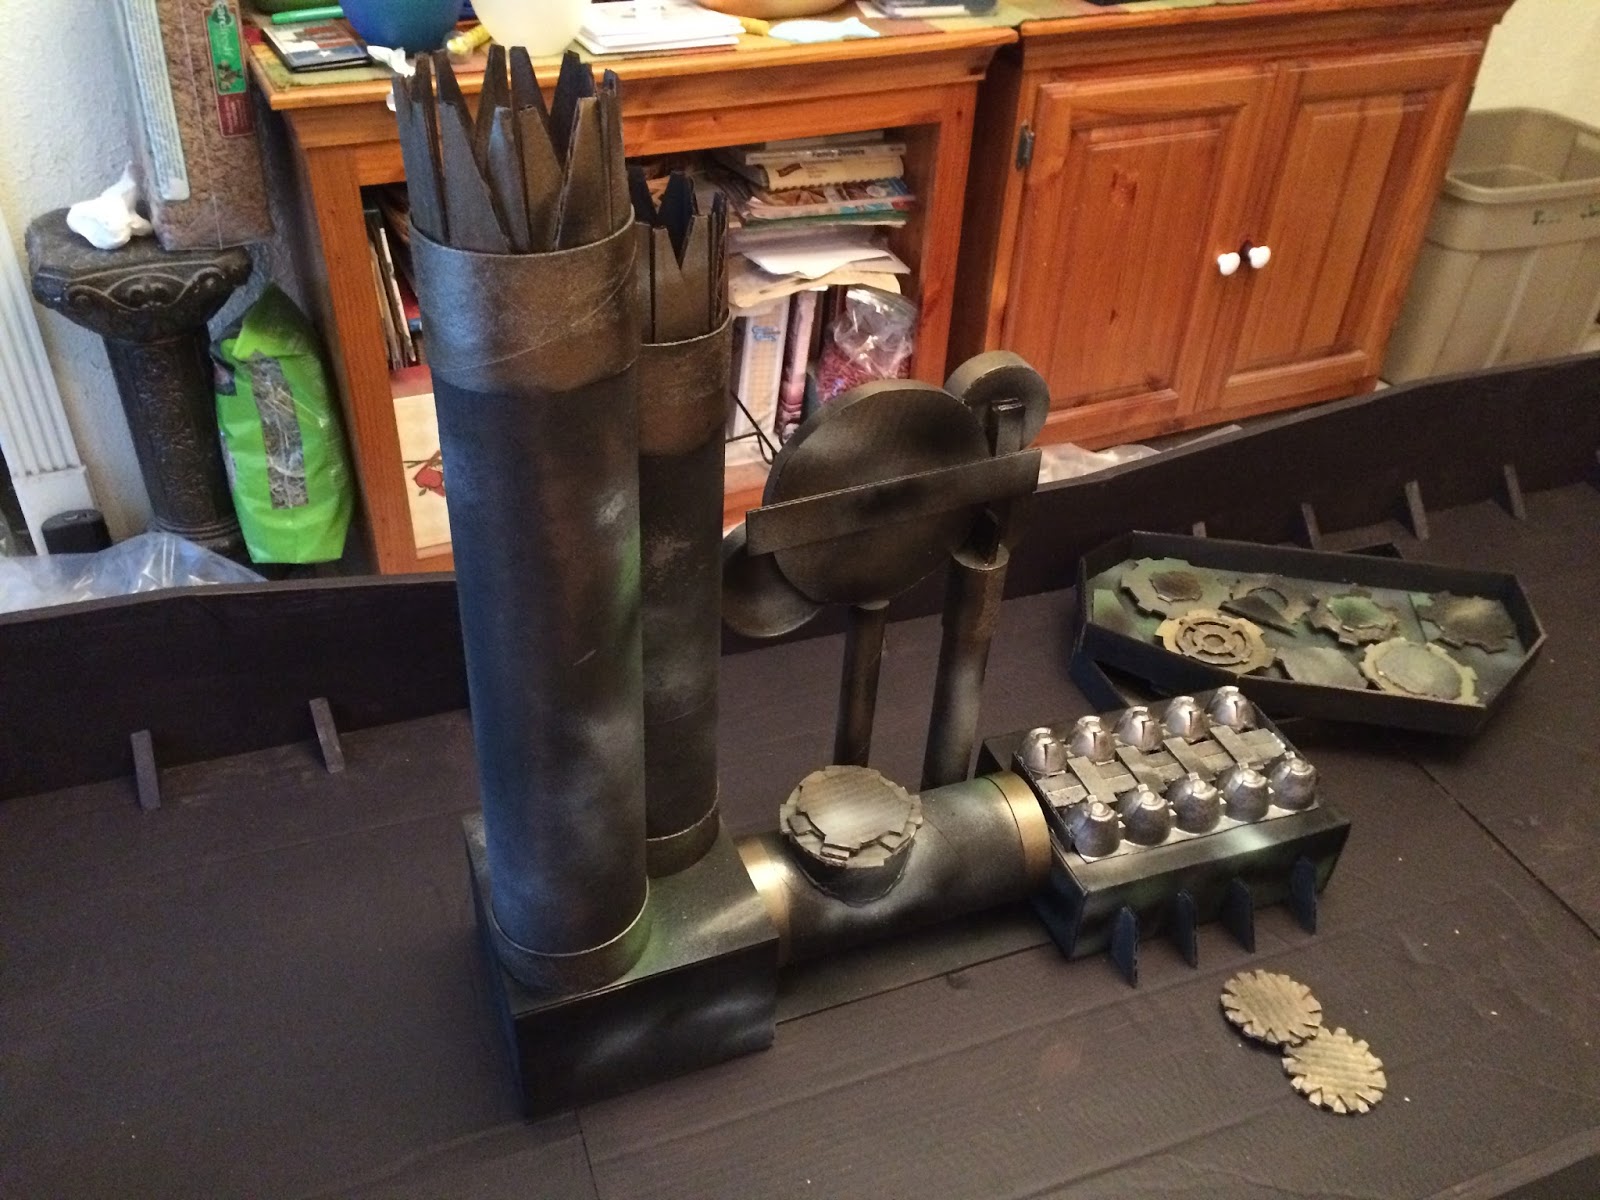
The engine block for the rear of the boat, made from various cardboard tubes, boxes and a cardboard egg container

Here you can see the gauge faces of the engine.

Various wing deigns are proposed

Krista draws the Phoenix Head ornament

The Phoenix Head ornament and wings completed

More cutting

So much cutting
Finally, the pontoons and deck pieces were finished and glued together into the final boat shape. Thick cardboard was used to make sides about ten inches high around the deck. All of the edges were sealed with water activated paper tape so that no exposed edge of cardboard was showing.

Boat almost finished. More cardboard was added to create a continuous wall around the deck.
After the boat was glued up, it was turned over and the pontoons and the lower four inches of the walls around the deck were painted with three layers of waterproof paint. That was followed by one layer of red exterior paint on the bottom of the boat and black exterior paint for the top of the boat. I chose those colors because that was what was available in the discounted paint section of Home Depot.

Waterproofing the boat

The final color
At that point, the boat part of the boat was finished. The ornament was added on race day using Velcro and gorilla tape. Before the race, most of the stuff that stuck out from the boat which might hinder paddling was removed, such as the paddle wheels, the smokestacks and the Phoenix head ornament. This made it much easier for the crew to enter the boat when launching it from the shore and taking the paddle wheels off made it possible for the middle person to help row.
Here are some pictures of the boat on race day.

Arrival at the park. Getting ready to carry the boat to the pond.

The Phoenix Mast Head. The flames below the head are made from the scales of the dragon head from the previous year's boat.

Finished paddle wheel. They were made to lift off from the boat before the race.

View of the gear panels and a view of the gauge faces on the motor assembly.

View of the engine from the back of the boat.

Matthew, Krista and Kyle; the valiant crew

Getting ready to enter the water

Most of the ornament has been removed to make racing easier
The race went very well. In the adult division, only the crew of the boat are allowed to touch the boat while launching it from the shore. Our crew had a little bit of trouble getting into the water due to the length of the boat, but eventually they made it and they took off straight as an arrow. Even though they were one of the last boats to enter the water they were one of the first to reach the buoys at the halfway point. This is where our design really worked well. The boat is long and wide and therefore does not turn easily, but this was no problem at all. Since the boat is symmetrical, everyone just turned around on the deck and they brought the boat back backwards. While everyone else was making their turns we were well on the way back. One other boat, from a rival Venture Crew was also doing well that day. They managed to catch and even overtake our boat for a short time on the way back, but in the end our crew never gave up and our boat touched shore about a second ahead of theirs. Matthew then stood up on the deck to take a bow and celebrate our victory and redemption.


Finally, a word of thanks to those who helped us. The crew came up with the design of the boat and how to decorate it, but we did receive a lot of technical construction advice from youtube. Use the following searches for some very good tips on how to build a cardboard boat.
Mike Thompson Cardboard Boat - Mike has some excellent videos dealing with the mathematics of boat design as well as practical construction tips.
City of Arlington Cardboard Boat School - Just about everything you need to know to design and build a boat